Setting the PID controller of a drone properly

Good hover and poor hover
Drones flying not intrinsically stable and require a flight controller. Is this is good set the drone does fly stably, otherwise not. How can you adjust the PID controller will be demonstrated on a drone.Typically powered by a brushless motor . Other flying models you can adjust analog. Well-functioning PID controller enable amazing climb flights and long rang flights.Innovative drone technologies are also possible.
All information without guarantee and without any liability.
The characteristics of a good hover are:
- The drone is stabilised in the air and gives a very stable impression.
- In disturbance such as by a gust of wind, the drone reacts so that only minimal deflections are recognizable.
- Long flight time and low power consumption of the engines. Point 1 and 2 can also be achieved with a mediocre control, which regulates the engines too strong and accordingly requires a lot of energy.
The above points are to be weighted accordingly depending on the application. A sport pilot is more emphasis on points 1 and 2 as someone who wants to break a hover record. The PID values thus are also related to the application of the copters.
The PID controller in a drone
PID controller are often used for controlling a drone. This is a program in the drone, which evaluates the sensor data and drives the motors accordingly via motor controller. PID stands for: proportional–integral–derivative and will be explained later.hold the drone
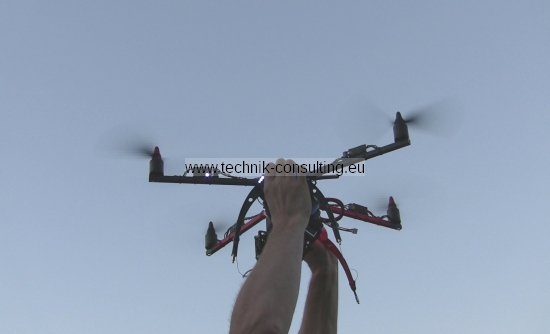
Hint: If you hold the drone, you change their properties for the controller. If you think, for example, hold very firmly the drone, it acts like a heavy drone for the controller. Hold the drone at the beginning really strong and if you have a good feeling, loosen the handle slowly. The drone will never be released. The P controller is particularly sensitive to the strength of the handle. If in doubt, you halve the value determined again.
The drone will taken to the stability limits in the tests. The drone is not damaged, if it is well hold and reasonable components are installed.
Setting the PID controller
First, you set all the controller parameters to zero, which is equivalent to switching off the controller. Successively adjust the P, D and I parameters. Make a note of the maximum values, which are determined in the tests. These values must never exceed. The measured values are the basis for further optimization.Hint: Each controller has a point at which it works optimally. This point is referred to as operating point. You also need to reach the operating point. So Normally you have to give at least as much thrust that the drone can hover.
If the drone is built halfway symmetrical (seen from above), you can set equate the roll and pitch values of the controller. If the drone is an asymmetrical structure as different long arms, the roll and pitch control should be set separately.
The yaw controller must be set separately, best in the end if the roll and pitch control fit. The yaw controller will require a very high probability of other values, as pitch and roll!
Remember
- Pitch-axis: The drone tilts forward or backward.
- Roll-axis: The drone tilts to the left or right side.
- Yaw-axis: The drone revolves viewed from above counter or counterclockwise.
Start simultaneously with pitch and roll with a symmetrical drone. Only P, then D and possibly I.
Then adjust the yaw controller as well.
Determination P value and what happens at the wrong set values
The P controller, with some drones also known as gain value, is the most important regulator of the flight drone. As the name suggests, the closed-loop control is proportional to the sensor data. Consider, for a better understanding of the following drone.
If the P-value is too low the drone can not maintain a stable attitude because the controller does not intervene strongly enough. Drone flies unstable. At the motor noise you can hear a slow control.
If the P-value is too high the drone will oscillate because the motor will control maximum on only small changes in angle. In extreme cases the motors switch between standstill and maximum speed many times per second back and forth. The drone is here unstable and uncontrollable. A crash is the result.
To find a good P value gradually increase it until the hand-held drone begins to oscillate. Then you set this value to about 50%. The drone will then react accordingly heavily on attitude changes. Set the P value rather too low as too high. A too high P-value (= oscillating) crashes the drone. Copter with a set too low P controller you can usually still land halfway.
Determination of D component and what happens at the wrong set values
The D means "derivative". The stronger the signal changes, the stronger intervenes this controller. The signal value does not matter but only the rate of change.The D-value is needed for quick reactions. Imagine a gust front. The drone is thereby rotated quickly. The P controller however produces only enough power at larger deflections. This is not enough to bring the drone back again. The D-Controller only responds to changes of the sensor data. The faster change the sensor data, the more this control intervenes.
To illustrate we consider again our drone. Imagine the D-regulator as a flexible rod (yellow in the animation) with a small weight (green dot in the animation) at the end. Tilt the drone to the left, speaks to the controller and reduces the engine power of the right engine. Keep the small weight on the scale in mind. The D-value of the controller corresponds to the amount of change.
Increase the D-value gradually until the drone begins to oscillate rapidly and with small amplitude. At this moment, the gain is too high and interfering signals will be amplified. At the engine noise you can hear a "chirp". This costs a lot of battery power and reduces the flight time dramatically.
Set the D-value at 50% of the determined limit.
Investigation I component and what happens at the wrong set values
The "I" comes from "Integral" and simply means summing of the sensor signal over time.The I-controller changes the engine power continuously, depending on the deflection angle and the time. The I-component is required for correction in which, despite optimally adjusted P and D controllers, the flight drone is not just hovering in the air. It is typical for this are not an optimal center of gravity of the drone or aerodynamic influences in rapid flights.
If the I value is set too high, the drone begins to oscillate, similar to a set too high P-value. Leave the I-value as low as possible.
Reminder for the PID control
About the controller following statements can be made:| controller | description | effect |
|---|---|---|
| P-controller | Acts proportional to the sensor signal. | In the present. |
| I-controller | Is constantly changing the performance, depending on the deviation and elapsed time. | Refers to interference from the past (eg additional weight). |
| D-controller | Will be active at quick changes. | Acts in the future and tries to respond with rapid changes "foresight". |
Good set controller
If all three controllers are in operation, the drone flies stable, even during disturbance. The procedure described here provides the controls, so that the drone remains in the air. The 50% rule (= 50% of full scale) leads in most drones at a good first result, however, depends on many factors. Always be careful with newly hired controllers and fly only a few slow laps just above the ground. Simultaneously also know the limits of the controller, which you must never exceed. Stay always with sufficient reserve below the limits. Otherwise, a flight battery can already do with other weight the drone unstable.The limits you should redetermine if:
- The drone has been substantially changed several times (eg cable cross sections, changed mass distribution, frame)
- Other motors, motor controllers or propellers are used.
- Other flight battery (voltage, weight, internal resistance)
Also note that the above-determined limits move in the air a little, because
- the battery voltage drops and results in a slightly weaker control of the motor.
- In fast flights, the working area of the propeller changes. The motors turn more quickly overall.
- Aerodynamic conditions affect the control behavior in flight. A drone which acts like a sail influences the limit in flight more.
- Temperature of the components. A cool battery has for example a higher internal resistance than a warm one.
Therefore stay always with reserve below the limits of the PID controller.
Have you performed the steps above, this does not mean that the controller already working optimally. Further improvements must be made by observation in flight.
first flight
For the first flight you observe the following information- An adequate distance (at least 50 meters) to other people and buildings.
- A meadow with tall grass is optimal. A small area for takeoff and landing should be available.
- Fly initially only a few "hops" a few seconds flight time and less than one meter altitude.
- Fly initially (if you think the controller fit) narrowly (= max. one meter) above the ground
- If possible take a look then the log files whether the controller run into saturation. Recognizable by the cut of values. If this is the case, reducing the control parameters.
- windless
- If the drone becomes uncontrollable or start to oscillate land immediately, if necessary cut power.
- Do make small steps in progress. 3D aerobatics with poor controllers is expensive.
- Stay calm. Steering wild on the stick is worse than quietly take away the gas.
Hint: If your drone (without GPS) after releasing the control stick in the pitch or horizon mode continues to fly in a horizontal position, this is normal. For the controller the drone is straight. That it moves relative to the ground, the controller does not notice.
Other typical sources of error
- Sensors not calibrated.
- Sensors are not firmly attached to the frame. Even rubber dampers are not suitable.
- Sensors installed incorrectly.
- Engines arrangement and settings in the software do not match.
- drone is too heavy or underpowered.
- Ready for extreme maneuvers without grope to the limits.
- Poor or unstable mechanical construction.
If the drone really even crash, do not give up. This happens every time - usually later when experimenting.
Optimization in flight
A few rules for optimizing the flight:Drone reacts slowly and hovers bad or unstable (eg dances, wobbles)
Increase P-value and decrease D value. Maybe decrease I value. The P value must in no case be higher than the above-determined threshold.
During hover the drone drifts
Increase the I term and possibly P-value.
Oscillation during fast flights
I-value too high or too low - depending on the drone.
Drone oscillates slightly with disturbances (eg nudge or gust of wind)
D value down
Drone reacts too slowly to disturbances (eg nudge or gust of wind)
Increase D-value and possibly P-value.
determine center of gravity of an drone
If your drone is not stable to fly, you should check the COG. Depending on the drone and control can a poor COG cause the instability of the drone. The COG is located right in the middle between the motors. Sometimes the focus is determined by the "diagonal method". However this does not provide for all drones a useful result. In the "diagonal method" are simply the diagonal of the motors with eg a cord (blue in the picture) is shown. The intersection should be the center of gravity. Unfortunately this is not always true, as seen in the image. The black cross is located exactly in the middle between the motors and thus the real COG.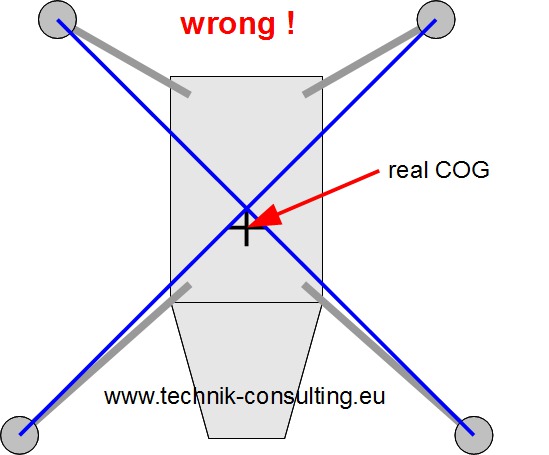
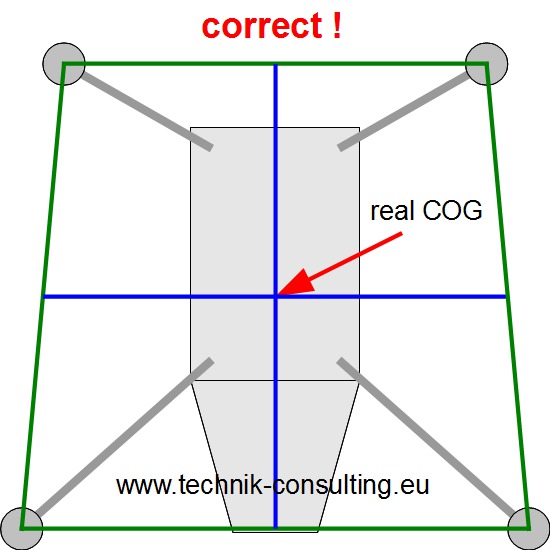
Better it is outside (green screen) to stretch a cord around the motor axes. Then measure with a meter stick the length of each outside half and make a mark on the string. If these markers linked to a cross (blue in the picture), the intersection is the actual center of gravity, the should have the drone.
Check the COG by balancing the finished drone on two fingers. Then check the other axis. Move necessary components in the drone, such as the battery, in order to optimally adjust the COG.
Talk to us
If you want some variety, check out some nice 3D models to print out.